Before I continue, I just wanted to show you something:
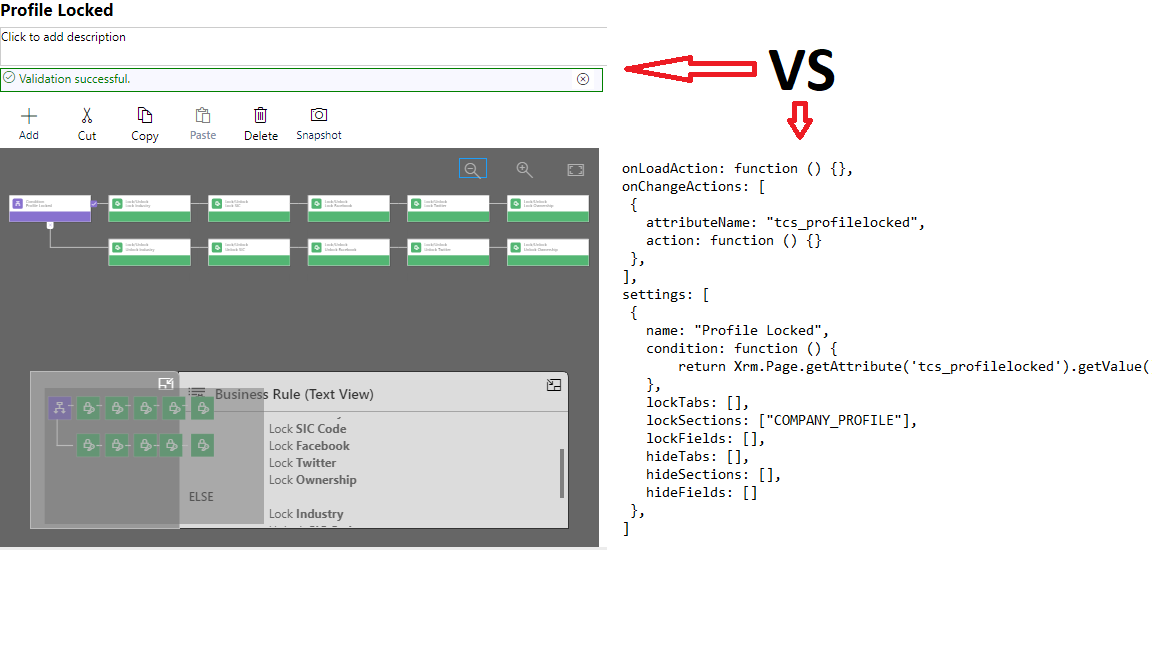
On the left side is what you would have to do if you wanted to hide all the fields in the company profile section on the out of the box Account form. There are only 5 fields there; however, when using a business rule, you have to do lock/unlock, so you have to add two actions per field to the business rule. This kind of business rule will quickly become rather complicated if the number of fields turns 10.. or 15.. or 20.
On the right site is what a javascript solution can do to simplify that business rule. And there is another advantage to it: you don’t even need to update the script once it’s created – in that particular example, it will be operating on the section level, so you can keep adding/removing fields to/from the section, and the script will be picking them up automatically.
I think it’s one of the improvements we will see in the out of the box business rules sooner or later, but, for now.. there are TCS Tools🙂
Here is how it works:
1. Add tcs_/scripts/FormSupport.js web resource to your form
2. Create a web resource for the following script
function GetFormConfiguration() {
    return {
        onLoadAction: function () {},
        onChangeActions: [
        ],
        settings: [
        ]
    };
}
function InitializeFormSupport()
{
  TCS.FormSupport.GetFormConfiguration = GetFormConfiguration;
  TCS.FormSupport.Init();
}
3. Add that new web resource to the form as well
4. Add OnLoad event handler to the form
InitializeFormSupport will be the function name for that event handler
5. Publish all customizations
From here, you can focus on the configuration of the rules – all the preparations have been done.
So, now, you just need to add onChange actions and, also, settings.
Every action has two elements:
- attributeName (required) – it’s the name of the attribute that, when updated, will make the engine to re-apply visibility/disabled rules
- action (can be null) – it’s a function that will be called when an attribute is updated (for example, you can use it to update some other attributes)
Every setting has the following elements:
- name (can be anything)
- condition – it’s a function that will verify some conditions. If the return value is true, the engine will hide or lock the tabs/sections/fields mentioned in the other properties of the setting element
- lockTabs: that’s the list of tabs where all the controls will be locked when the condition evaluates as true (for example.. lockTabs: [“tab1”, “tab2”])
- lockSections: that’s the list of sections where all the controls will be locked (for example.. lockSections: [“section1”, “sections2”])
- lockFields: that’s the list of attributes where all corresponding controls will be locked (for example.. lockFields: [“field1”, “field2”])
- hideTabs: same as lockTabs, but all controls will be hidden
- hideSections: same as lockSections, but all controls will be hidden
- hideFields: same as lockFields, but all controls will be hidden
Here is an example for the company profile rule mentioned at the beginning of this post:
function GetFormConfiguration() {
    return {
        onLoadAction: function () {},
        onChangeActions: [
         {
           attributeName: "tcs_profilelocked",
           action: function () {}
         }
        ],
        settings: [
         {
           name: "Profile Locked",
           condition: function () {
               return Xrm.Page.getAttribute('tcs_profilelocked').getValue() == true;
           },
           lockTabs: [],
           lockSections: ["COMPANY_PROFILE"],
           lockFields: [],
           hideTabs: [],
           hideSections: [],
           hideFields: []
        }
       ]
    };

}

function InitializeFormSupport()
{
   TCS.FormSupport.GetFormConfiguration = GetFormConfiguration;
   TCS.FormSupport.Init();
}
That’s it. If you want, you can add additional elements to the onChangeActions array, and you can add additional elements to the settings array.
I will explain the internal workings of this solution in the next post.. Continue reading