Did you ever try to create a copy of Dynamics Portal web site in the same Dynamics Instance? You may want to ask “why would I do such a thing”, but think of it this way:
- You cannot link the same Dynamics Portal to more than one web site record at a time, but you can still create multiple web sites and switch your Dynamics Portal between those web sites
- With a little imagination, you can actually come up with a bit of development framework even when you only have access to just one Dynamics Portal (you would use your original web site as a “dev” site, you would do development on that web site, and, then, you would copy that web site to a production “web site” record once it’s all done, and, then, you would switch Dynamics Portal to use that web site record instead of the “dev” one)
- Sure that leaves the question of how do you stop external users from going to the dev site while you are working on it, but that can be done through IP filtering: https://docs.microsoft.com/en-us/business-applications-release-notes/october18/service/dynamics365-portal/restrict-portal-access-by-ip-address
Or, maybe, there is another scenario where you’ll find this useful.. Either way, this post is all about creating a copy of the web site record (and all the related records: web pages, languages, web files, etc)
First, there are a few pre-requisites for this exercise
I will be using the latest build of EZChange, so, if you wanted to follow the steps below, make sure to get that build first.
Once you have it, create a folder somewhere and two files in that folder:
- portal.ecp
- variables.xml
The first file there is a package definition file for EZ Change. The second file is where you will specify the connection strings.
For the content of those files, have a look here: https://github.com/ashlega/ItAintBoring.EZChange/tree/master/SamplePackages
Just copy-paste the content from the corresponding sample files on github above.
In the end, you should have a folder that looks like this:

And another folder where you have extracted the EZ Change(before extracting, make sure to unblock the zip file):

You will also need a Dynamics instance with Dynamics Customer Service portal installed(at least that’s what I tested), but it will likely work with other portal types, too.
Once you’ve done all that, follow the steps below
- Start ItAintBoring.EZChange.exe
- From the File menu, open Potal.ecp package

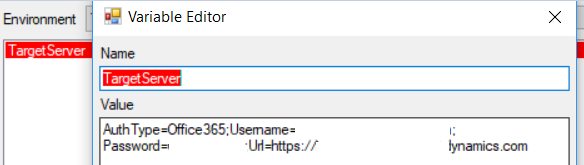
- From the Package menu, open “Variables Editor”, select “qa” environment, and update the connection string:
- From the Package menu, select “Build” option. You’ll be asked for the environment, so select “QA”. Then click ok and wait until the build has completed. This is when you’ll get one more sub-folder in the same folder where the Portal.ecp file is stored – that new subfolder is where all the exported data and solution files are stored for the package druing the “build” phase:

- Now you can run the package (“Package”->”Run”). It’s going to take a while to run it – in my case it takes at least 25 minutes, but, in the end, you are going to have a copy of your web site record(s) including all the web pages, forms, etc:


You might want to rename the newer ones(look at the “created on” to identify them) so you could easily see the difference.
There you go – you have cloned your web site(s)! Feel free to bind you Dynamics Portal to a copy now:

A few things are worth mentioning here
- There are two solutions in the Portal.ecp package. They are not linked to any Dynamics solutions – all we need is to export/import data. However, the first solution will have some build actions (data export), then some run actions (disabling the plugins and importing data). The second solution will have run actions only: second pass for the data to restore the references, and, also, a few actions to re-enable portal plugins
- Data import actions are expected to keep original record id-s. So, to create a copy of the web site, we have to modify those ID-s consistently. This is why, for the “Portal Data” solution, Guid Shift parameter is set to 1 – this will ensure that all guid-s in the exported data are “shifted”(this applies to both entity id-s and lookup references):

- Web Site Binding records won’t be copied through this process – Dynamics Portal can be linked to only one web site at any particular moment, and that linkage is maintained through the Portal Admin page

Note: will try adding a video late
Hi Alex
Fatastic guide and tool for cloning a Dynamics Portal! One issue I have faced is that the styling of my site has gone funny. I changed the main title on the site and then hit Cntrl + F5. Since doing this, I can seem to get the styling to re-apear. I tried out your tool on a trial subscription.
I reset the portal and its working now. Also didn’t realise I had to re-start the portal after changing the website binding to reference the cloned website. This is working ok now. Again – thanks for this guidance as it has saved me alot of time and effort!
Hey, thanks for the feedback (and good to know it’s working after the reset)
Thanks a lot for this great tool and its guide. It save a lot of time.
But I have some remarks :
– The tool doesn’t copy the WebFiles notes. So for that you have to use the XRMToolBox tool : “Portal 365: Web Files and Site Settings synchronizer”, otherwise you will have your website without style, images and javascript.
– The tool doesn’t attach the WebRoles to contacts (the WebRoles are created).
– There is a problem with decimal field type. The tool could not clone it.
But all this issues can be resolved manually or using XRMToolBox.
Thanks again for this tool that saved me a lot of work and effort.