Now that we went through the process of creating a Power Automate flow that’s using Word Template action, why don’t we get this integrated into a model-driven application?

Let’s first create a very simple invoice form. You should be able to do it easily (or you could use any other entity – I’m just doing it so it’s consistent with the word template):

How do we add “Print” functionality in such a way that we’d be utilizing Power Automate flow created earlier?
There are a few options. We could use a web resource to add an HTML button somewhere on the form. Or we could ribbon dashboard to add “Print” button to the command bar.
So, let’s deal with the Flow first.
1. We need the Flow to start accepting document id as a parameter
The easiest way to do it would be to pass it as a url parameter to the HTTP Request trigger. If it were a POST trigger, I might want to add specify json schema. But, to simplify, I’ll just set it up as a “GET” trigger:

And, then, I’ll initialize a variable with the documentId parameter from the URL:

triggerOutputs()[‘queries’][‘documentId’]
If you wanted to read more on what’s happening there, have a look at the docs:
https://docs.microsoft.com/en-us/azure/logic-apps/logic-apps-http-endpoint#get-parameters
From here on, I can simply add “&documentId=…” to the trigger url, and my Flow will have documentId value stored in the variable. Which means I can, then, use it to query invoice record from the CDS/Dataverse.
And, of course, I can copy Flow url from the Flow designer:

2. We need to add “Response” action to the Flow so it actually sends the document back right away

Basically, it’s just sending the output of “Populate a Microsoft Word Template” action through the response. But, also, there are a couple of headers.
The first one is used to specify content-type. For that matter, we could also generate a PDF document, which would have a different content-type.
And the second header specifies the file name.
Here are header values, to make it easier:
- application/vnd.openxmlformats-officedocument.wordprocessing
- inline; filename=”test.docx”
And you would probably want to replace “test.docx” with something more useful. Invoice # maybe?
Anyway, this is where we need to go back to the Invoice form and add a button there.
Before that, let’s think it through:
- We will have a button on the form
- That button will “call” a javascript function (that’ll be a javascript web resource)
- And that javascript function will open a new window using Flow trigger url (with an additinal documentId parameter which will take the value of the invoice ID)
So, let’s add a web resource first.

There is nothing extraordinary there. There is a documentId parameter. There is Flow trigger url. There is concatenation. And there is window.open. As promised.
Now let’s fire up Ribbon Workbench in the XrmToolBox, and let’s customize Invoice command bar there:


For the command, here is how it’s defined (notice that Crm Parameter – FirstPrimaryItemId):

This is how my javascript function (printInvoice) will receive documentId parameter.
Now I just need to add “Enable Rule”:

And link it to the command:

That’s it, now it’s all abot publishing the changes and watching Scott Durow advertising his PCF course:

Finally, there is my “Print” button:

Was not that difficult? Or was it? In either case I think it’s a worthy replacement for the classic word templates in D365.
And I could also suggest a few improvements (might or might not blog about them later):
- That “print” button could actually be a fly-out button with a few menu items in the drop down menu. We could have different print forms. And which ones are available might be decided based on the invoice type, for example. How cool is that?
- We might send that invoice to the client by email right away. It’s a Flow, so why not?
- We might store that invoice in Sharepoint
- We might convert it to PDF, and, again, send a PDF version by email (there is a correspondig OneDrive action in Power Automate)
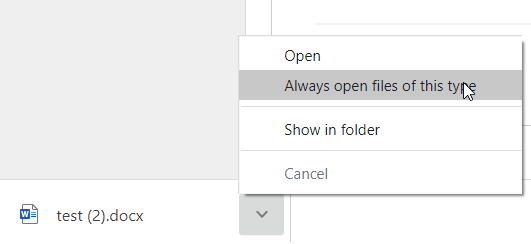
- One advantage of PDF files is that they will usually open automatically once downloaded. For the Word Documents, you can achieve the same result in Chrome, at least:
Pretty sure this list of improvements can get rather long, so… have fun with this improved version of Word Templates!
PS. Of course it would be nice if there was an easier way to create those “buttons” (or to integrate such Flows into the model-driven apps). Well, one can dream![]()
how come there is no comment here, thanks a lot for spending time and preparing this very detailed, useful post!